How to apply u tip hair
How To Apply U Tip Hair?
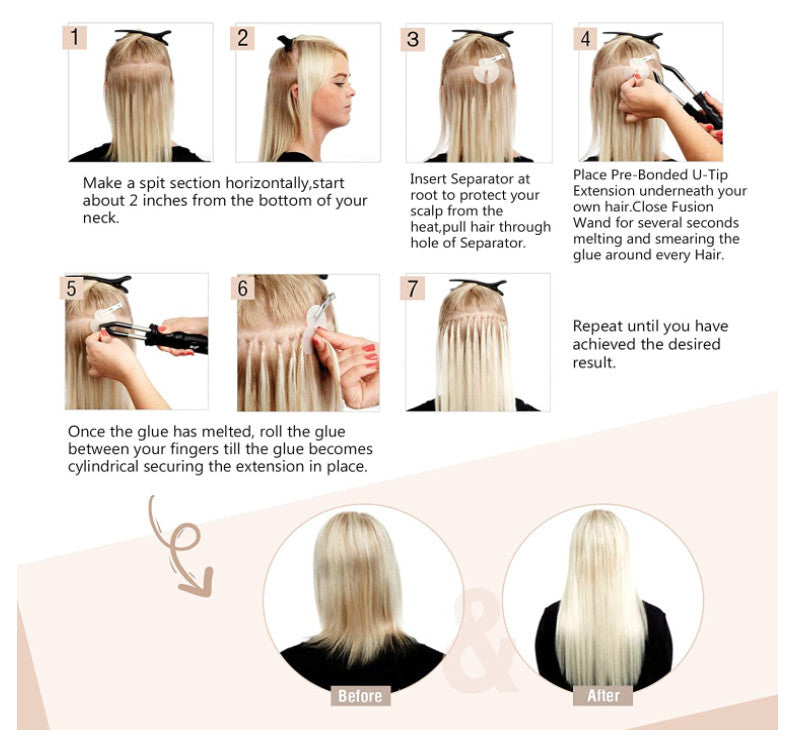
Applying U Tip hair extensions requires precision and careful attention to ensure a secure and long-lasting attachment. Before attempting to apply U Tip extensions, it's essential to have the necessary tools and materials ready. You'll need U Tip hair extensions, a heat connector or fusion tool, sectioning clips, and a tail comb. Here's a step-by-step guide on how to apply U Tip hair extensions:
1. Prepare your natural hair:
- Start with clean, dry, and tangle-free hair. Wash and dry your hair thoroughly before beginning the application process.
- Comb through your hair to remove any knots or tangles. Using a detangling spray can help make the process easier.
2. Section your hair:
- Divide your hair into sections to make the application more manageable. Use sectioning clips to secure the hair you're not working on, leaving a thin section of hair at the nape of your neck to start with.
3. Take a small section of your natural hair:
- Choose a small section of hair that matches the width of the U Tip extension strand you'll be applying.
- Make sure the section is clean and free of any styling products, as this will help the extension bond better.
4. Insert the U Tip extension:
- Hold the U Tip extension strand and place the keratin tip against the selected section of your natural hair, around 1 centimeter away from the scalp.
- Use a heat connector or fusion tool to apply heat to the keratin tip. This will soften the adhesive, allowing it to bond with your natural hair.
5. Roll the U Tip extension onto your hair:
- While the keratin is soft, gently roll the U Tip extension strand around the selected section of natural hair.
- Use your fingers or the fusion tool to mold the keratin around the natural hair strand, creating a strong bond.
6. Allow the bond to cool:
- Give the bond a few seconds to cool and set. Avoid any excessive movement during this time to ensure a secure attachment.
7. Repeat the process:
- Continue working your way up your head, section by section, applying U Tip extensions until you achieve your desired look.
- Be mindful of the distance between the bonds and your scalp to maintain a comfortable and natural appearance.
8. Blend and style:
- Once all the extensions are in place, carefully blend your natural hair with the extensions using a comb or brush.
- Style your hair as desired, keeping in mind that U Tip extensions can withstand most heat styling tools.


